Jacleklm's Blog

异步编程

2019/11/01

异步编程,就是通过利用客户端环境的 Event-Loop 机制,去异步地执行某些代码

一些自己之前容易乱的关系

异步函数 = 异步操作,异步函数中包含回调函数做参数。回调函数只是一个普通函数。异步函数可以写成Promise形式

以前,异步编程的方法,大概有下面四种。
回调函数
事件监听
Promise 对象

回调函数

回调函数,就是把任务的第二段单独写在一个函数里面,等到重新执行这个任务的时候,就直接调用这个函数。英语名为 callback。
例如fs的读取文件

1
2
3
4
fs.readFile('/etc/passwd', function (err, data) {
if (err) throw err;
console.log(data);
});

readFile 函数的第二个参数,就是回调函数。第一个参数是错误对象err

Promise

当多个函数嵌套的时候,会出现“回调地狱”,代码难以理解。于是出现了Promise解决这个问题
Promise其实只是异步函数的一种新写法,允许将回调函数的横向加载,改成纵向加载

1
2
3
4
5
6
7
8
9
10
11
12
13
14
15
16
17
18
const readFile = require('fs-readfile-promise')
// 或者
const promisify = require('util').promisify
const readFile = promisify(fs.readFile)

readFile('./promisify.js')
.then(data => {
console.log(data.toString())
})
.then(function(){
return readFile(fileB);
})
.then(function(data){
console.log(data.toString());
})
.catch(err => {
console.log(err)
})

第一种方式是使用了 fs-readfile-promise 模块,它的作用就是返回一个 Promise 版本的 readFile 函数;第二种方法能把异步函数进行promisify处理赋值给一个变量。Promise 提供 then 方法加载回调函数,catch方法捕捉执行过程中抛出的错误

Promise对象

Promise对象代表一个异步操作,有三种状态:pending(进行中)、fulfilled(已成功)和rejected(已失败)。只有异步操作的结果,可以决定当前是哪一种状态
Promise对象的状态改变,只有两种可能:从pending变为fulfilled和从pending变为rejected。只要这两种情况发生,状态就凝固了,不会再变了,会一直保持这个结果,这时就称为 resolved(已定型)

Promise实例

Promise实例的生成方式

  • 用new生成
  • promisify
  • 直接require一些模块

监听结果的 Promise.prototype.then()

普通写法

1
2
3
4
5
6
7
8
9
10
11
12
13
14
15
16
17
18
19
20
//  普通写法。先定义一个加载图片的函数
function loadImg(src, callback, fail) {
var img = document.createElement('img')
// load事件触发后就会调用作为第二个参数的callback函数
img.onload = function () {
callback(img)
}
// error事件触发后就会调用作为第三个参数的fail函数
img.onerror = function (err) {
fail(err)
}
img.src = src
}
var src = 'http://img1.qunarzz.com/piao/fusion/1804/ff/fdf170ee89594b02.png'
// 正式加载
loadImg(src, function (img) {
console.log(img.width)
}, function (err) {
console.log(err)
})

用Promise的写法

1
2
3
4
5
6
7
8
9
10
11
12
13
14
15
16
17
18
19
20
function loadImg(src) {
return new Promise(function (resolve, reject) {
var img = document.createElement('img')
img.onload = function () {
resolve(img)
}
img.onerror = function (err) {
reject(err)
}
img.src = src
})
}
var src = 'http://img1.qunarzz.com/piao/fusion/1804/ff/fdf170ee89594b02.png'
var result = loadImg(src)
// then里面的第一个参数其实就是resolve函数,第二个参数(可选)就是reject函数(也可以写成catch的形式)
result.then(function (img) {
console.log(img.width)
}, function () {
console.log(err)
})

捕获异常的Promise.prototype.catch()

虽然then的第二个参数可以是reject函数,不过后来大家都默认then只接收一个参数,最后统一用catch捕获异常

1
2
3
4
5
result.then(function (img) {
console.log(img.width)
}.catch(function (err) {
console.log(err)
})

执行顺序与串联

首先,Promise 新建后,里面的代码就会立即执行
执行顺序

1
2
3
4
5
6
7
8
9
result.then(function (img) {
console.log(img.width)
}.catch(function (err) {
console.log(err)
})
// 忽然想在图片加载后也打印下hight,可以这么写,这两个.then几乎会同时触发
result.then(function (img) {
console.log(img.height)
})

也可以这么写

1
2
3
4
5
6
7
8
9
10
11
12
13
14
15
16
17
18
19
20
21
22
23
24
25
26
27
console.log(1)
function loadImg(src) {
return new Promise(function (resolve, reject) {
var img = document.createElement('img')
console.log(2)
img.onload = function () {
resolve(img)
}
img.onerror = function (err) {
reject(err)
}
img.src = src
})
}
result.then(function (img) {
console.log(img.width)
console.log(4)
// 如果要在后面继续加.then 打印img的height,必须return img,下一个.then才能接收到这个参数
return img
}.then(function (img) {
console.log(img.height)
console.log(5)
}.catch(function (err) {
console.log(err)
})
console.log(3)
// 打印结果是1,2,3,4,5 (width和height同理)

PS:Promise实例中的代码如果不涉及费时的操作,它的.then()执行顺序是比setTimeout第二个参数的为0的代码要早的
串联
一般用于Ajax请求,这里图片做演示
多个Promise实例要串联的时候,需要在.then()中return 第二个实例

1
2
3
4
5
6
7
8
9
10
11
12
13
14
var src = 'http://img1.qunarzz.com/piao/fusion/1804/ff/fdf170ee89594b02.png'
var result = loadImg(src)
var src2 = 'http://img1.qunarzz.com/sight/p0/1603/1c/1c67791edbe2677b90.img.jpg_250x250_8f1dcbbd.jpg'
var result2 = loadImg(src2)
result.then(function (img) {
console.log('第一个图片加载完成', img.width)
// 如果这种多个.then()没有返回一个premise实例,那就还是用原来那个promise实例
return result2
}).then(function (img2) {
console.log('第二个图片加载完成', img2.width)
document.getElementById('div').appendChild(img2)
}).catch(function (err) {
console.log(err)
})

Promise.all() & Promise.race()

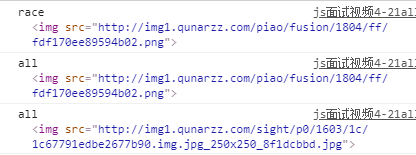
这两个方法用于将多个 Promise 实例,包装成一个新的 Promise 实例。都接收一个promise对象的数组。all()是待全部完成之后,统一执行success,race()是只要有一个完成,就执行success

1
2
3
4
5
6
7
8
9
10
11
var src = 'http://img1.qunarzz.com/piao/fusion/1804/ff/fdf170ee89594b02.png'
var result = loadImg(src)
var src2 = 'http://img1.qunarzz.com/sight/p0/1603/1.jpg0_8f1dcbbd.jpg'
var result2 = loadImg(src2)
Promise.all([result, result2]).then(datas => {
console.log('all', datas[0])
console.log('all', datas[1])
})
Promise.race([result, result2]).then(data => {
console.log('race', data)
})

执行结果为:

Generator 函数

简介

Generator 函数是一个状态机,封装了多个内部状态。形式上,有两个特征,一是,function关键字与函数名之间有一个星号;二是,函数体内部使用yield表达式,定义不同的内部状态。一定要return,否则返回的对象的value属性值为undefined
调用 Generator 函数,会返回一个内部指针,而不是返回结果
用next方法,会移动内部指针(即执行异步任务的第一段),指向下一个遇到的 yield 语句
每次调用 next 方法,会返回一个对象,表示当前阶段的信息。value 属性是 yield 语句后面表达式的值,表示当前阶段的值;done 属性是一个布尔值,表示 Generator 函数是否执行完毕,即是否还有下一个阶段

1
2
3
4
5
6
7
function* gen(x){
var y = yield x + 2;
return y;
}
var g = gen(1);
g.next() // { value: 3, done: false }
g.next() // { value: undefined, done: true }

当**next()**传入参数的时候,会被当作上个阶段异步任务的返回结果,此阶段的value就等于这个参数(一般用于yield用完了的时候)
【next()本来就有打印的功能?】

1
2
3
4
5
6
7
function* gen(x){
var y = yield x + 2;
return y;
}
var g = gen(1);
g.next() // { value: 3, done: false }
g.next(5) // { value: 5, done: true }

yield表达式只能用在 Generator 函数里面,用在其他地方都会报错
在 Generator 函数里,yield表达式如果用在另一个表达式之中,必须放在圆括号里面

虽然 Generator 函数将异步操作表示得很简洁,但是流程管理却不方便(即何时执行第一阶段、何时执行第二阶段)。所以有了以下两种方案:

Thunk 函数 + Generator方案

Thunk 函数是自动执行 Generator 函数的一种方法。是一个实现“传名调用”的临时函数,把这个临时函数作为参数传入真正的函数即可

JavaScript 语言是传值调用。JS中的Thunk替换的是多参数函数而不是表达式,将其替换成一个只接受回调函数作为参数的单参数函数。
单参数版本,就叫做 Thunk 函数

使用方法

Thunkify 模块

Thunk 函数现在可以用于 Generator 函数的自动流程管理

co 函数库 + Generator方案

co 模块用于 Generator 函数的自动执行。co函数返回一个Promise对象,因此可以用then方法添加回调函数。

async / await

与Generator比

异步编程的最高境界,就是根本不用关心它是不是异步。很多人认为Async就是异步操作的终极解决方案
如果认真看完两种自动化的 Generator 的方法 ,会有一种蛋疼的感觉(因为有这种感觉所以这两种方案没有仔细总结在博客里)。Generator 设计的初衷就是为了流程控制,而我们却给它加上了自动的流程机。还不如使用 promise.then()。Async 函数作为自带流程机的 Generator 语法糖,就完美得解决了这个矛盾

async 函数就是将 Generator 函数的星号(*)替换成 async,将 yield 替换成 await,仅此而已
Generator版:

1
2
3
4
5
6
7
8
9
10
11
12
13
14
15
16
17
var fs = require('fs');

var readFile = function (fileName){
return new Promise(function (resolve, reject){
fs.readFile(fileName, function(error, data){
if (error) reject(error);
resolve(data);
});
});
};

var gen = function* (){
var f1 = yield readFile('/etc/fstab');
var f2 = yield readFile('/etc/shells');
console.log(f1.toString());
console.log(f2.toString());
};

async 函数版本

1
2
3
4
5
6
var asyncReadFile = async function (){
var f1 = await readFile('/etc/fstab');
var f2 = await readFile('/etc/shells');
console.log(f1.toString());
console.log(f2.toString());
};

与Promise比

相比Promise,.then()只是将callback拆分了,实际代码的语义化,执行顺序仍旧不清晰。async/await才是最直接的同步写法。解决JS单线程造成的编写的代码视觉顺序和实际执行顺序不同的问题

async / await用法总结

例如可以把Promise章节的代码改写为

1
2
3
4
5
6
7
8
9
10
11
12
13
14
15
16
17
18
19
20
21
22
function loadImg(src) {
return new Promise(function (resolve, reject) {
var img = document.createElement('img')
img.onload = function () {
resolve(img)
}
img.onerror = function (err) {
reject(err)
}
img.src = src
})
}
var src = 'http://img1.qunarzz.com/piao/fusion/1804/ff/fdf170ee89594b02.png'
var src2 = 'http://img1.qunarzz.com/sight/p0/1603/1c/1c67791edbe2677b90.img.jpg_250x250_8f1dcbbd.jpg'

const load = async function () {
const result = await loadImg(src)
console.log(result)
const result2 = await loadImg(src2)
console.log(result2)
}
load()

async

  • 用于定义异步函数,函数可以返回一个 Promise 对象(所以函数执行的时候可以使用 then 方法添加回调函数)
  • async函数执行的时候,一旦遇到 await 就会先返回,等到触发的异步操作完成,再接着执行函数体内后面的语句
  • async函数中的forEach如果参数函数也是async函数的话,会报错,因为forEach内循环的async函数其实是并发的,而不是先后顺序的。正确的写法是采用 for 循环,再在里面写async函数。By the way,确实希望多个请求并发执行,可以使用 Promise.all 方法
    1
    2
    3
    4
    5
    6
    7
    async function dbFuc(db) {
    let docs = [{}, {}, {}];
    let promises = docs.map((doc) => db.post(doc));

    let results = await Promise.all(promises);
    console.log(results);
    }
    await
  • 用于需要等待一段时间才能出结果的情况(eg. 将异步函数的执行结果赋值给变量),await后面必须跟一个Promise实例(或说异步函数)
  • await 命令后面的 Promise 对象,运行结果可能是 rejected,所以最好把 await 命令放在 try…catch 代码块中(或更实用的写法,在后面直接加.catch()的写法)
    1
    2
    3
    4
    5
    async function myFunction() {
    await somethingThatReturnsAPromise().catch(function (err){
    console.log(err);
    });
    }
  • await 命令只能用在 async 函数中,如果用在普通函数中,就会报错。PS: 其实await也能作为某些异步函数的运行前缀,例如用puppteer做爬虫的时候可以写await page.focus('#kw'),但自己写的async函数似乎不可以,还没明白

执行顺序

1
2
3
4
5
6
7
8
9
10
11
12
13
14
15
const page = {
load: async function () {
console.log(3)
const result = await loadImg(src)
console.log(result)
const result2 = await loadImg(src2)
console.log(result2)
console.log(4)
}
}

console.log(1)
page.load()
console.log(2)
// 1, 3, 2, <img xxx>, <img xxx>, 4

参考资料
ECMAScript6标准入门
阮一峰博客-《深入掌握 ECMAScript 6 异步编程》系列文章
慕课网-揭秘一线互联网企业前端JavaScript高级面试

CATALOG
  1. 1. 一些自己之前容易乱的关系
  2. 2. 回调函数
  3. 3. Promise
    1. 3.1. Promise对象
    2. 3.2. Promise实例
      1. 3.2.1. Promise实例的生成方式
      2. 3.2.2. 监听结果的 Promise.prototype.then()
      3. 3.2.3. 捕获异常的Promise.prototype.catch()
      4. 3.2.4. 执行顺序与串联
    3. 3.3. Promise.all() & Promise.race()
  4. 4. Generator 函数
    1. 4.1. 简介
    2. 4.2. Thunk 函数 + Generator方案
      1. 4.2.1. 使用方法
    3. 4.3. co 函数库 + Generator方案
  5. 5. async / await
    1. 5.1. 与Generator比
    2. 5.2. 与Promise比
    3. 5.3. async / await用法总结
    4. 5.4. 执行顺序