Jacleklm's Blog

React - HOC

2020/05/16

本文大部分来自ConardLi 的 blog,建议直接看原博客

概述

Mixin 的危害

React 官方文档在Mixins Considered Harmful一文中提到了 Mixin 带来了危害:

  • Mixin 可能会相互依赖,相互耦合,不利于代码维护
  • 不同的 Mixin 中的方法可能会相互冲突
  • Mixin 非常多时,组件是可以感知到的,甚至还要为其做相关处理,这样会给代码造成滚雪球式的复杂性

React 现在已经不再推荐使用 Mixin 来解决代码复用问题,因为 Mixin 带来的危害比他产生的价值还要巨大,并且 React 全面推荐使用高阶组件来替代它

HOC 简介

HOC-官方文档
高阶组件(HOC)是 React 中用于复用组件逻辑的一种高级技巧。HOC 自身不是 React API 的一部分,它是一种基于 React 的组合特性而形成的设计模式

具体而言,高阶组件是参数为组件,返回值为新组件的函数。实现在原有组件的基础上对其新增功能和行为

HOC 的实现方式

属性代理

常用方式,一般是在 render() 返回被包裹的组件,并把需要的 props 传递给它

一个简单的例子:

1
2
3
4
5
6
7
8
9
const visibleHOC = (InnerComponent) => {
return class extends Component {
render() {
const { visible, ...restProps } = this.props
if (visible === false) return null
return <InnerComponent {...restProps} />
}
}
}

另一个例子

假设有一个组件要在 localStorage 拿数据,然后渲染出来,它的代码应该差不多长这样:

1
2
3
4
5
6
7
8
9
class MyComponent extends Component {
componentWillMount() {
let data = localStorage.getItem('data')
this.setState({ data })
}
render() {
return <div>{this.state.data}</div>
}
}

如果有很多其他组件也需要从 LocalStorage 中获取同样的数据展示出来时,那我要写很多次这段代码,为了效率我决定写用装饰器模式包装一下,所以就有了高阶组件(高阶组件本质是函数,所以这里写成函数)

1
2
3
4
5
6
7
8
9
10
11
12
13
14
function localHOC(InnerComponent) {
return class extends Component {
componentWillMount() {
let data = localStorage.getItem('data')
this.setState({ data })
}
render() {
return (
// 通过{...this.props} 把传递给当前组件的属性继续传递给被包装的组件WrappedComponent
<InnerComponent data={this.state.data} {...this.props} />
)
}
}
}

对比原生组件增强的项:

  • 可操作所有传入的 props
  • 可操作组件的生命周期
  • 可操作组件的 static 方法
  • 获取 refs

反向继承

返回一个组件,继承原组件,在 render 中用 super.render() 调用原组件的 render。由于继承了原组件,能通过 this 访问到原组件的生命周期、props、state、render 等,相比属性代理它能操作更多的属性

1
2
3
4
5
6
7
function inheritHOC(InnerComponent) {
return class extends InnerComponent {
render() {
return super.render()
}
}
}

对比原生组件增强的项:

  • 可操作所有传入的 props
  • 可操作组件的生命周期
  • 可操作组件的 static 方法
  • 获取 refs
  • 可操作 state
  • 可以渲染劫持

HOC 可以实现什么功能

组合渲染(常用)

可使用任何其他组件和原组件进行组合渲染,达到样式、布局复用等效果

eg. 一个在外层给组件包裹 Antd 的 Card 的 HOC。这里用了函数组件的写法。

1
2
3
4
5
6
7
8
9
10
11
12
import { Card } from 'antd'

const CardHOC = (InnerComponent) => {
return (props) => {
const { title = null, ...restProps } = props
return (
<Card title={title}>
<InnerComponent {...restProps} />
</Card>
)
}
}

通过反向继承再实现一次。这里是 class 组件

1
2
3
4
5
6
7
const CardHOC = (InnerComponent) => {
return class extends InnerComponent {
render() {
return <Card title={this.props.title}>{super.render()}</Card>
}
}
}

条件渲染(常用)

根据特定的属性决定原组件是否渲染。第一个 DEMO 就是这个

操作 props

可以对传入组件的 props 进行增加、修改、删除或者根据特定的 props 进行特殊的操作

1
2
3
4
5
6
7
8
9
const propsHOC = (InnerComponent) => {
return (props) => {
const newProps = {
...props,
user_name: 'Jacle',
}
return <InnerComponent {...newProps} />
}
}

获取 ref

高阶组件中可获取原组件的ref,通过 ref 获取组件实例,如下面的代码,当程序初始化完成后调用原组件的 log 方法 (默认情况下,你不能在函数组件上使用 ref 属性,因为它们没有实例)。适合用 ref 的情况:管理 input 的 focus;触发强制动画;…

1
2
3
4
5
6
7
8
9
10
11
12
13
14
15
16
17
function refHOC(WrappedComponent) {
return class extends Component {
componentDidMount() {
this.wapperRef.log()
}
render() {
return (
<WrappedComponent
{...this.props}
ref={(ref) => {
this.wapperRef = ref
}}
/>
)
}
}
}

这里注意:调用高阶组件的时候并不能获取到原组件的真实 ref,需要手动进行传递。详见refs 转发

状态管理

将原组件的状态提取到 HOC 中进行管理,如下面的代码,我们将 Input 的 value 提取到 HOC 中进行管理,使它变成受控组件,同时不影响它使用 onChange 方法进行一些其他操作。基于这种方式,我们可以实现一个简单的双向绑定

1
2
3
4
5
6
7
8
9
10
11
12
13
14
15
16
17
18
19
20
21
22
23
24
25
26
27
28
29
30
31
32
33
34
35
36
37
38
function proxyHoc(WrappedComponent) {
return class extends Component {
constructor(props) {
super(props)
this.state = { value: '' }
}

onChange = (event) => {
const { onChange } = this.props
this.setState(
{
value: event.target.value,
},
() => {
if (typeof onChange === 'function') {
onChange(event)
}
}
)
}

render() {
const newProps = {
value: this.state.value,
onChange: this.onChange,
}
return <WrappedComponent {...this.props} {...newProps} />
}
}
}

class HOC extends Component {
render() {
return <input {...this.props}></input>
}
}

export default proxyHoc(HOC)

操作 state

上面的例子通过属性代理利用 HOC 的 state 对原组件进行了一定的增强,但并不能直接控制原组件的 state,而通过反向继承,我们可以直接操作原组件的 state。但是并不推荐直接修改或添加原组件的 state,因为这样有可能和组件内部的操作构成冲突

1
2
3
4
5
6
7
8
9
function debugHOC(WrappedComponent) {
return class extends WrappedComponent {
render() {
console.log('props', this.props)
console.log('state', this.state)
return <div className="debuging">{super.render()}</div>
}
}
}

渲染劫持

通过反向继承的方式,可直接增强(而不是更改)由原组件 render 函数产生的 React 元素,eg:

1
2
3
4
5
6
7
8
9
10
11
12
13
14
function hijackHOC(WrappedComponent) {
return class extends WrappedComponent {
render() {
const tree = super.render() // render函数内实际上是调用React.creatElement产生的React元素。它所有属性的writable特性均被配置为了false,即所有属性是不可变的。所以我们只能重新创造一个元素,用React.cloneElement()
let newProps = {}
if (tree && tree.type === 'input') {
newProps = { value: '渲染被劫持了' }
}
const props = Object.assign({}, tree.props, newProps)
const newTree = React.cloneElement(tree, props, tree.props.children)
return newTree
}
}
}

React.cloneElement()克隆并返回一个新的 React 元素,使用 element 作为起点。生成的元素将会拥有原始元素 props 与新 props 的浅合并。新的子级会替换现有的子级。来自原始元素的 key 和 ref 将会保留。

HOC 的优雅写法

compose

在实际应用中,一个组件可能被多个 HOC 增强,我们使用的是被所有的 HOC 增强后的组件。直接写的话代码可读性会很差:

1
const newComponent = aHOC(bHOC(cHOC(InnerComponent)))

我们可以用类似柯里化的方式,手动封装一个简单的函数组合工具,将写法改写如下

1
2
const compose = (...fns) => fns.reduce((f, g) => (...args) => g(f(...args)))
compose(aHOC, bHOC, cHOC)(InnerComponent)

ES7 的 Decorators

ES7-Decorators

1
2
3
4
5
6
7
8
9
10
11
12
13
function aHOC(InnerComponent) { ... }
function bHOC(InnerComponent) { ... }
function cHOC(InnerComponent) { ... }

@aHOC
@bHOC
@cHOC
class InnerComponent extends Component {
// ...
}
// 上面这个InnerComponent等同于
class InnerComponent extends Component {}
InnerComponent = aHOC(InnerComponent) || InnerComponent

Decorators 是 ES7 的一个提案,还没有被标准化,但目前 Babel 转码器已经支持,我们需要提前配置 babel-plugin-transform-decorators-legacy:

1
"plugins": ["transform-decorators-legacy"]

还可以结合上面的 compose 函数使用:

1
2
3
4
5
const hoc = compose(aHOC, bHOC, cHOC)
@hoc
class Input extends Component {
// ...
}

使用 HOC 的注意事项

  • 静态属性拷贝
    当我们应用 HOC 去增强另一个组件时,我们实际使用的组件已经不是原组件了,所以我们拿不到原组件的任何静态属性,我们可以在 HOC 的结尾手动拷贝他们:
1
2
3
4
5
6
7
8
9
10
function proxyHOC(WrappedComponent) {
class HOCComponent extends Component {
render() {
return <WrappedComponent {...this.props} />
}
}
HOCComponent.staticMethod = WrappedComponent.staticMethod
// ...
return HOCComponent
}

如果原组件有非常多的静态属性,这个过程是非常痛苦的,而且你需要去了解需要增强的所有组件的静态属性是什么,我们可以使用hoist-non-react-statics来帮助我们解决这个问题,它可以自动帮我们拷贝所有非 React 的静态方法,使用方式如下:

1
2
3
4
5
6
7
8
9
10
import hoistNonReactStatic from 'hoist-non-react-statics'
function proxyHOC(WrappedComponent) {
class HOCComponent extends Component {
render() {
return <WrappedComponent {...this.props} />
}
}
hoistNonReactStatic(HOCComponent, WrappedComponent)
return HOCComponent
}
  • Refs 不会被传递给被包装组件
  • 不要在组件的 render 方法中使用高阶组件,尽量也不要在组件的其他生命周期方法中使用高阶组件。因为高阶组件每次都会返回一个新的组件,在 render 中使用会导致每次渲染出来的组件都不相等(===),于是每次 render,组件都会卸载(unmount),然后重新挂载(mount),既影响了效率,又丢失了组件及其子组件的状态。高阶组件最适合使用的地方是在组件定义的外部,这样就不会受到组件生命周期的影响了
  • 约定:不要改变原始组件。高阶组件应该是一个没有副作用的纯函数 (函数的调用参数相同,则永远返回相同的结果)
  • 约定:透传不相关的 props。即 props 传递
  • 约定:最好使用displayName,方便调试。官方推荐使用 HOCName(WrappedComponentName)。eg. 赋予 return 组件一个静态属性:
1
static displayName = `aHOC(${WrappedComponent.displayName})`

实际应用场景

逻辑复用

多个组件拥有类似的逻辑,我们要对重复的逻辑进行复用。eg,上面写过的 localstorage 的例子

可用、权限控制

当没权限的时候不展示某个组件,就是上面提到的组合渲染

表单校验

eg. Semi 中用 withField 封装自定义表单控件
通过 withField,你可以将其他自定义组件扩展成为表单控件,由 Form 接管其行为(value, onChange; 还有在上方插入Field 的<Label>, 下方插入 Field 的<ErrorMessage>等)

注意:自定义组件必须为受控组件,关于受控组件/非受控组件请参考react docs

Redux 的 connect


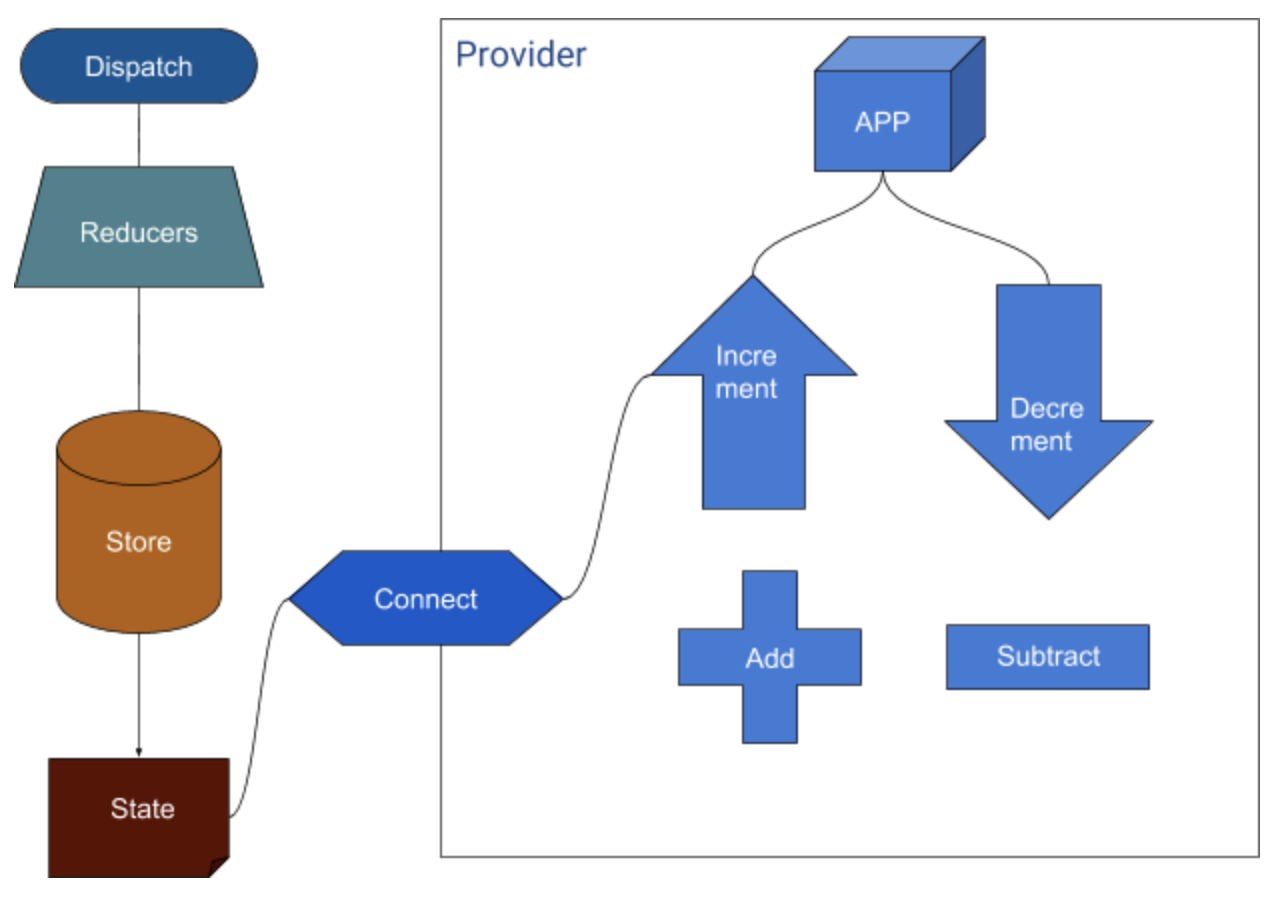
下面就是一个简化版的connect实现:

1
2
3
4
5
6
7
8
9
10
11
12
13
14
15
16
17
18
19
20
21
22
23
24
25
26
27
28
29
30
31
32
33
34
35
36
37
38
xport const connect = (mapStateToProps, mapDispatchToProps) => (WrappedComponent) => {
class Connect extends Component {
static contextTypes = {
store: PropTypes.object
}

constructor () {
super()
this.state = {
allProps: {}
}
}

componentWillMount () {
const { store } = this.context
this._updateProps()
store.subscribe(() => this._updateProps())
}

_updateProps () {
const { store } = this.context
let stateProps = mapStateToProps ? mapStateToProps(store.getState(), this.props): {}
let dispatchProps = mapDispatchToProps? mapDispatchToProps(store.dispatch, this.props) : {}
this.setState({
allProps: {
...stateProps,
...dispatchProps,
...this.props
}
})
}

render () {
return <WrappedComponent {...this.state.allProps} />
}
}
return Connect
}

connect函数其实就做了一件事: 将mapStateToProps和mapDispatchToProps分别解构后传给原组件,这样我们在原组件内就可以直接用props获取state以及dispatch函数了

缺点

  • 嵌套太多 HOC,代码可读性会比较差
  • HOC 可以劫持 props,在不遵守约定的情况下也可能造成冲突

参考资料
ConardLi 的 blog
官网

CATALOG
  1. 1. 概述
    1. 1.1. Mixin 的危害
    2. 1.2. HOC 简介
  2. 2. HOC 的实现方式
    1. 2.1. 属性代理
      1. 2.1.1. 一个简单的例子:
      2. 2.1.2. 另一个例子
    2. 2.2. 反向继承
  3. 3. HOC 可以实现什么功能
    1. 3.1. 组合渲染(常用)
    2. 3.2. 条件渲染(常用)
    3. 3.3. 操作 props
    4. 3.4. 获取 ref
    5. 3.5. 状态管理
    6. 3.6. 操作 state
    7. 3.7. 渲染劫持
  4. 4. HOC 的优雅写法
    1. 4.1. compose
    2. 4.2. ES7 的 Decorators
  5. 5. 使用 HOC 的注意事项
  6. 6. 实际应用场景
    1. 6.1. 逻辑复用
    2. 6.2. 可用、权限控制
    3. 6.3. 表单校验
    4. 6.4. Redux 的 connect
  7. 7. 缺点